roush2000 Posted January 18, 2015 Report Share Posted January 18, 2015 Roush thanks for the complement I see your selling some coral, I am off the next 2 days and need to stock the tank I will be contact you this week Sorry I am bad with matching up forum ids with ppl. Did u get a chance to come by I still have lots! Quote Link to comment Share on other sites More sharing options...
cbellm Posted January 18, 2015 Author Report Share Posted January 18, 2015 Sorry man I didnt, I made a few rounds to some ppls homes as well as my first trip to modern aquatixs. I was hoping to get the opertunity but had alot to do that day and ended had to cut my trips around town short. Quote Link to comment Share on other sites More sharing options...
cbellm Posted January 18, 2015 Author Report Share Posted January 18, 2015 Hello all, Just got a shipment in from Live Aquaria to stock up my fuge a bit. As the fuge is a 75 gallon tank on a stand in my fish room I wanted to do something a little different with this fuge. Instead of it being something that no one sees I wanted this to be somewhat visibly appealing and a place where I can have some critters that I wouldn’t put into my display. Thus far in the fuge is 3 mangroves, cheato, 2 mermaid tails, and a bottle brush, also I bought a condy anemone which I have always liked the color of but hated when they moved because they can sting anything to death. Also I placed a reef lobster in the fuge in hopes it will eat any extra food that ends up in the tank. Here are a few pictures What big tank wouldn’t have a decent QT system? My system is composed of 3 tanks at this time. 2 are 20 gallon tall tanks which sit on a steal stand with hallow bottom, other is my old sump a 29g tall. The system is a cheap setup which with all I have put into my build it was nice! The tanks have a maxijet for some flow, a sponge filter, a small heater, and an air stone which is placed on a manifold so one air pump supplies all 3 tanks. The light is an old t5 light I got from ebay. It sits on the top of the top 20g tank and supplies both tanks. I have all the extra PVC fittings thrown in the tanks so the fish have a place to hide as they are in the tanks for 30 days. My system is: Day 1: Fish arrive no light are on Day 2-3: lights are turned on fish are offered food for the first time Day 3: start to add copper Day 4-18 fish are placed in copper to prevent ich entering my display Day 18-20 water changes decrease copper in QT and observation Day 20-30 Fish are observed until they are allowed to be released into display. All Coral are dipped in a few solutions. First they are inspected, and removed from the frag plug they arrived on (often pest are on the plugs) next they are placed in Coral Rx dip for 10minutes and transferred to another bucket with Reef dip coral disinfectant, after they are placed into a QT tank without copper to observe them. They will be dipped one more time before entering the tank. I am a bit more stringent on this with SPS, and zooanthids than I am on LPS And this is why! This is what I caught on a frag this week! Quote Link to comment Share on other sites More sharing options...
MrsBugmaster Posted January 18, 2015 Report Share Posted January 18, 2015 Sounds like a good QT process, but I would also add 2 treatments (one before copper and one after)of Prazi Pro to get ride of flukes and other parasites. And if they show signs of ich I would treat with copper for 28 days. Great set up! Quote Link to comment Share on other sites More sharing options...
roush2000 Posted January 18, 2015 Report Share Posted January 18, 2015 Great idea with the lobster in refugium! Prob too big to eat to many of the pods, that's why I have left mine animal free but love the lobster idea Quote Link to comment Share on other sites More sharing options...
cbellm Posted January 21, 2015 Author Report Share Posted January 21, 2015 Thanks I will look into the Parazi Pro Stuff you mentioned Quote Link to comment Share on other sites More sharing options...
cbellm Posted January 31, 2015 Author Report Share Posted January 31, 2015 Got some fish in a few days ago as well as some new equipment. Looking forward to doing some more work on the tank: Equipment to be added: Liter Meter for auto water change security camera to link into my Apex Live stock: Finally going to get some bioload and corals started: 3 Yellow tangs 1 Naso Tang Exquisite wrasse ORA Strawberry shortcake acro ORA Montipora Undata Pink milipora green acro colony I also picked up a container of Parazi Pro like suggested and will be adding treatment for flukes to the QT program. I will post some pictures when I have some time to set up the new equiptment Quote Link to comment Share on other sites More sharing options...
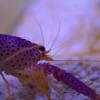
cbellm Posted February 11, 2015 Author Report Share Posted February 11, 2015 Finally a day off! After working over 60 hours this week I wanted to take some time and leave you all with some updates. A few highlights of the past few week… I have started adding coral to the tank! I don’t have any pictured current however because the lights are off in the display while I am working on updating you all, but I have a few from the fuge…. The Lobster is happy and very photogenic: And I am getting great growth throughout the fuge in plant life. The mermaid’s tails (2 of them) that I got have somehow already started putting off offspring I have 2 small ones that have started poking out of the substrate and all 3 of the red mangroves I have planted now have roots and have a few leaves that are sprouting underwater: I have also taken a bit of time to work on the water change. I got my litermeter in the mail about 2 wks ago and set it up this past week. I am very happy with it as now the only time I need to make water is really only a switch and a few scoops of salt away. I have measured out the exact amount of salt I need to get the salinity where I need it, with the 55 gallon tanks I am using and a regiment of 5 gallons a week (10% per week) I have to make water only once every 10 wks (there is a 5 gallon loss in the tank due to my fill line being before it is topped off and a gallon of water that can’t be pulled at the bottom of the tank when it is nearly empty. The finally part of this project included the addition of a 35 gallon reservoir which the old water is dumped, this tank is plumbed to drain when full into a floor drain in my basement which my RODI unit drains into, the 35 gallon tank is available to make easy water changes in my QT system as well as to fill the QT tanks quickly when I get a new fish as I don’t leave my QT tanks filled and wash them out after I fish adding new livestock Quote Link to comment Share on other sites More sharing options...
cbellm Posted February 11, 2015 Author Report Share Posted February 11, 2015 A Weekend project, I cant stand when I want to start a water test and all the vials still have droplets of water in them so I decided to make myself a drying rack today if you are interested in building one here is how I make mine: Items needed: A marker A thin dowel rod I picked mine up at home depot for under a dollar Something to cut your dowel rod A piece of scrap wood this one is 8” x 5” make sure the wood you use is at least ½” thick Wood glue A drill bit the same size as your dowel rod Latex based paint Step one: take the block of wood and a draw 2 straight lines which you will want a few inches apart from one another Step two: using your drill bit, drill holes equally spaced from one another along the line you drew I measured mine out and placed them at an angle using a board to help guide me in making the same angle each hole Step three: Cut your dowel rod to your desired length, I cut mine at 4 inches each (remember to leave a little extra length as they will have to set into the holes you just drilled Step four: place a dab of glue over each drilled hole and push a piece of the cut dowel rod into each one Step Five: paint with a latex based paint to help prevent moisture from causing issues I installed mine on a shelf next to the desk I do my testing so they are easily accessible (Still plan to paint over the screws and cover the flaws in the wood). I would have placed one of these under my tank in the stand if I would have thought to do this sooner, I hate that half my testing manuals and boxes for my salifert kits have fallen apart due to wet vials. Quote Link to comment Share on other sites More sharing options...
ReefNewby82 Posted February 11, 2015 Report Share Posted February 11, 2015 Looking good as always Chris! Getting growth that quick from your fuse plants is cool too. Great idea on the vial rack because I know we all have that same problem. Thanks for the update! Quote Link to comment Share on other sites More sharing options...
Dustin1300 Posted February 11, 2015 Report Share Posted February 11, 2015 Nice, things are coming along! Get comments about your "lab" yet? Everyone ask to see my back room when they see then tank and are surprised at all the equipment on the back end! Quote Link to comment Share on other sites More sharing options...
cbellm Posted February 11, 2015 Author Report Share Posted February 11, 2015 Dustin, Yes, my friends that have seen it call it my mad scientist room! Quote Link to comment Share on other sites More sharing options...
cbellm Posted October 31, 2015 Author Report Share Posted October 31, 2015 I am not dead! haha. After some harassment I have given in am will be updating the forum! I had a few big things this summer (much like last summer) which lead to me being absent from the forums for a bit, I will have some time to post a bit more! The big project this summer was building a dock on our lake... a few pictures of the dock are below. I was happy to finally get it done, it was the first time I build a dock and it was quite a project however I am very happy with the results. Other news, after over a year of work I commissioned in the Army I have been in for 12 years but taking this step has been a big step in my career. There are a few new things in the tank that I will be happy to update. I have finally had some success in the tank that I was lacking. I increased the flow with tailing the WAV from Apex... I have to say that they put off a huge amount of Flow, much more than the Tunze that I was using. They say nearly 4000GPH and I believe it. Also the price of the starter pack is great! If you own a Apex already the kit is cheaper than buying any other controllable pump with the same flow. I looked at a few reputable options and have to say for the past 2 months I have been a happy camper, and controlling the pumps is very easy. The only down side I have seen is the larger profile however compared to TUNZE they are not much larger.... Lighting: USE A PAR METER. I checked what I had my Atlantiks at and was far below what I needed (80-90 PAR throughout the tank) after ramping them up over the past 2 months the corals colors are improving. I am seeing growth finally, and some of the corals I thought were dead are starting to make me believe the zombie corals may exist (montipora's seem to be the living dead). I didn't add additional lighting just have been slowly increasing light intensity. I will post more soon but hope you all are well, and hope you all enjoy a few non-aquaria related pictures I took of my summer project Quote Link to comment Share on other sites More sharing options...
cbellm Posted October 31, 2015 Author Report Share Posted October 31, 2015 1 Quote Link to comment Share on other sites More sharing options...
MrsBugmaster Posted October 31, 2015 Report Share Posted October 31, 2015 Awesome job on the deck. Would like to see some pics of your tank too. Quote Link to comment Share on other sites More sharing options...
Dustin1300 Posted October 31, 2015 Report Share Posted October 31, 2015 Congrats and awesome job on the deck! PAR meter is definitely useful when making sure you have your lighting set right, hope all looks better over the course of a few weeks. Quote Link to comment Share on other sites More sharing options...
Budman Posted October 31, 2015 Report Share Posted October 31, 2015 Nice dock looks like you did a great job Quote Link to comment Share on other sites More sharing options...
Msr224 Posted November 2, 2015 Report Share Posted November 2, 2015 Nice job on the dock and stairs. That's a project for sure. Let me know if you need anything on the lighting. 1 Quote Link to comment Share on other sites More sharing options...
cbellm Posted November 8, 2015 Author Report Share Posted November 8, 2015 Scott thanks for the offer. I am happy to say coral coloration is coming back I had the light way to dim. Everyone says watch out on LEDs "you can fry your coral" that is true however my advice now will be "watch out, you may not have enough par" I have been increasing my par values by ramping up the LEDs and had had some nice change in color of the coral. I still am using the Atlantik 2 and with the increase in power I have had some improvement. Currently I am running a ramp up and down over 10 hours, 5 at the highest values which is Channel 1 at 85, Channel 2 at 90 percent, Channel 3 at 75, and Channel 4 at 65. I plan on moving up after the corals have some time to adjust. I have about 180 par at the top of my rock work (4-5 inches from the surface) and am running 80 par at the sand. I have a few recovering pieces of coral that I thought were lost, always a nice surprise! here are a few pics please excuse the lack of coral I am a stickler I wont add more coral until I have some success... I am not a fan of killing and loosing money anyone interested in a Hector's Goby I suggest them. They are a great reef fish they are active a have a unique body shape. Also unlike may of my other golbies mine likes to swim all over the tank not just the bottom, which is great because many fish like to hide in a 320 Gallon tank. I have seen Modern Aquatix have a few in the past. I got mine at Liveaquaria 2 years a go and has been a very hardy fish Quote Link to comment Share on other sites More sharing options...
cbellm Posted November 8, 2015 Author Report Share Posted November 8, 2015 A little advice for you 2 part doser ppl. Drill an air hole in to your supply jugs cap. I have been dosing for a few weeks now and my gallon jug is nearly collapsed in on itself I had only drilled the supply line running into mine and drilled the hole air tight apparently... both my CA and KH jugs are now deformed... Quote Link to comment Share on other sites More sharing options...
cbellm Posted June 2, 2016 Author Report Share Posted June 2, 2016 Finally home! Some of you know, but I am in the military, and got home a week or so ago so glad to be back. I have had the tank on auto-drive with the apex over the past couple months. I am happy with the results no dead fish! The corals have not been impressive since I started the tank. To be honest I am thinking of making some changes to the old school, where I have had some success. But either way my fish have never looked so healthy as I have had with this tank. Sorry for the long absence (the growing theme). Quote Link to comment Share on other sites More sharing options...
MrsBugmaster Posted June 2, 2016 Report Share Posted June 2, 2016 Welcome home! Glad the tank is doing good. Quote Link to comment Share on other sites More sharing options...
blowfish770 Posted June 2, 2016 Report Share Posted June 2, 2016 Welcome back and thank you for your service to our country!! Quote Link to comment Share on other sites More sharing options...
ReefNewby82 Posted June 3, 2016 Report Share Posted June 3, 2016 CB! Good to hear about the tank and you being home! Apex for the win :v) Quote Link to comment Share on other sites More sharing options...
cbellm Posted July 24, 2016 Author Report Share Posted July 24, 2016 Anyone have any great ideas for lighting a refugium? I am wanting to up the anti on my lighting, which is currently 2 large LED spotlight LED's from Lowes which are doing a better job than Par 38 Reefcompulsions bulbs I was using. The Reefcompultions bulbs would be great for a smaller fuge no doubt (they were great at growing chaetomorpha) however the tank I am using for the refugium is a standard 75 gallon tank which is too deep to get enough penetration. I have mangroves about 8" out of the water at this time, I want something I can raise up but still penetrate deep enough to keep the condi nem happy as well as keep my other macros growing Quote Link to comment Share on other sites More sharing options...
Recommended Posts
Join the conversation
You can post now and register later. If you have an account, sign in now to post with your account.